Table of Contents
Mobile technology is at its zenith, impacting the everyday lives of people. Together with customer apps, enterprise apps are evolving as well, improving the productivity of businesses. It is important to build an app with all features and functionalities required by the customer and beneficial to the app user, but what is even more critical is a rigorous mobile application testing before the app is deployed. In this blog, I would be shedding light upon mobile app testing using Appium, the mobile automater.
Before moving on, let’s take a look at the basic types of mobile applications:
Native apps are apps that are present in devices and accessible using the corresponding icons in the home screen. Mobile web apps are apps that access websites on mobile through different browsers. Hybrid apps, on the other hand, are combinations of native apps and mobile web apps.
What makes testing mobile applications more challenging than testing web applications are the following factors:
Manually testing the application is simple. It can be done if the build is available in the form of apk (Android Application Package) file for android and ipa (iOS Appstore Package) file for iOS. You just need to follow these simple steps:
However the manual test process is repetitive and cumbersome. So for regression test cases and for complex scenarios that are time consuming, automation testing is preferred.
For mobile test automation, Appium is one of the many tools available in market. It is an open source, cross-platform test automation tool for native, hybrid and mobile web apps, tested on simulators, emulators, and real devices.
Appium is an HTTP server written in Node.js which creates and handles multiple Web Driver sessions for different platforms like iOS and Android.
Let’s take a look at the steps to set up Appium in Windows for automating an Android application, with the scripting language as Java.
Step 1: Install the Java Development Kit (JDK)
First of all, install JDK (Java Development Kit), which includes JRE plus the development tools for writing as well as running Java programs.
Step 2: Set Up Java Environment Variable Path
To edit the PATH environment variable:
Step 3: Install Android SDK / ADB on Windows
Download android SDK and run the downloaded installer. Follow the on-screen instruction and accept the defaults to complete the installation.
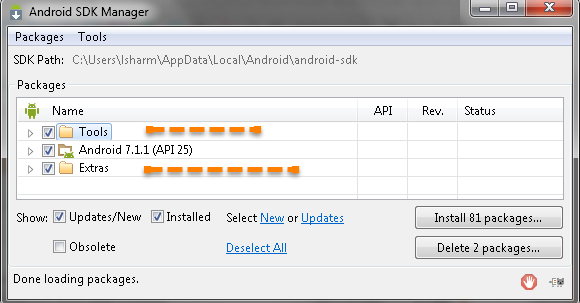
Step 4: Install Android SDK Packages

Install the APIs required based on the android version to be used. SDK manager will install all the chosen packages.
Step 5: Set up Android Environment Variable
After you’ve installed the Android SDK Environment Kit in Windows, you must set the ANDROID_HOME environment variable to point to the Android SDK installation directory.
In order to set up ANDROID_HOME Variable:
1) Open the Control Panel -> System or Security –> System; the same thing can be done by right-clicking on My Computer and choosing Properties.
2) Choose ‘Advanced system settings‘.
3) Under the Advanced tab, choose the Environment Variable option.
4) Select New in the System variables.
5) Define the variable name and provide android sdk path
Step 6: Download and Install NodeJs
Step 7: Install Microsoft .net Framework
Step 8: Download and Install Appium Desktop Client
Install the Appium Desktop client. Click on Appium.exe for Windows to download the ‘.exe’ file for Appium. Go with the latest version of Appium. Appium will open up, once the installation is done with the below message.
Step 9: Enabling Developer Mode Options on Android Phone or Tablets
Go to Settings -> About Phone -> Scroll down to the bottom again, where you see ‘Build number’. Tap on build number 7 times -> Developer Options -> Tick the USB Debugging check box.
Step 10: Install PdaNet to Connect with Android Device
Step 11: Install Eclipse IDE and Set up a Project
Once the project settings are done, we can start scripting. The basic part of the script involves defining the desired capabilities, a set of keys and values sent to the Appium server to tell the server what kind of automation session we are interested in starting up.
| KEYS | DESCRIPTION |
| browserName | Name of mobile web browser |
| appium-version | Version of Appium |
| platform Version | Mobile OS version |
| deviceName | Kind of mobile devices to be used |
| platformName | Kind of mobile OS platform to be used |
Look at the sample script for defining desired capabilities:
DesiredCapabilities cap = new DesiredCapabilities();
cap.setCapability(“browserName”, “chrome”);
cap.setCapability(“appium-version”, “1.4.0”);
cap.setCapability(“VERSION”,“5.1.1”);
cap.setCapability(“deviceName”,“ANDROID”);
cap.setCapability(“platformName”,“ANDROID”);
Attach Android device with your system and type adb device command on cmd prompt to verify that the device is attached or not. Launch Appium tool on your machine. Once the Appium is launched run the script written in Eclipse.
You are ready to go!! Happy scripting!!!